Monday, July 9, 2012

Adding GWT to an Eclipse Web Project.

Continued from  building-web-application-in-eclipse

This article builds on my previous posting on building a web application in Eclipse, which reached the point of demonstrating TDD (test driven development).

We start by adding GWT (Google Web Toolkit) to the basic web application which does not contain dynamic content and is configured to show only a simple index.html page.  Our goal is to add GWT.

Audience: Developers with some background in GWT who want an overview of  adding GWT capability to an existing web project. Nothing fancy.

Install GWT Plugin

In Eclipse, under Help->Install New Software, add the link to the GWT plugin and install.  We're using GWT 2.4 in this article.

Configure Project For GWT

Right click on the project name, and select Properties->Google.  Configure  war directory as /target/car-0.0.1-SNAPSHOT.  Enable the project to use Google Web Toolkit.

Create a new GWT Module

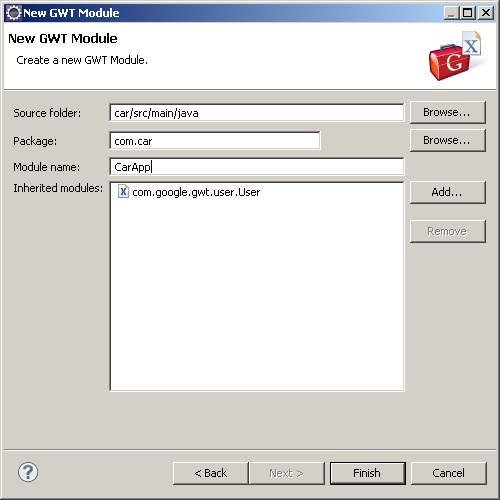
Select new->Other... Select Google Web Toolkit.  Select Module.  Go to 'next' step. Enter com.car for package. Enter "CarApp" for module name.


Your project should now look like this:


Create an Entry Point Class

Select new->Other... Select Google Web Toolkit.  Select 'Entry Point Class'.  We provide the name "CarAppEntryPoint"


Perform GWT Compile

Right click on project, select Google->GWT Compile. Add the entry point module we created in the previous step.


The compile will produce GWT artifacts in the exploded war folder.  In order for the entry point module to be executed, it must be referenced from the index.html page.


The script tag in the index.html file will look like this:
<script type="text/javascript" language="javascript" src="com.car.CarApp/com.car.CarApp.nocache.js"></script>

Just to satisfy ourselves that GWT is working, add a demo Label output to the page.  Our entry point class will look like this:

package com.car.client;

import com.google.gwt.core.client.EntryPoint;
import com.google.gwt.user.client.ui.Label;
import com.google.gwt.user.client.ui.RootPanel;

public class CarAppEntryPoint implements EntryPoint {

    public void onModuleLoad() {
       
        RootPanel.get("mainContainer").add(new Label("Hello There !"));

    }

}


Add GWT to pom.xml

This example uses GWT 2.4.0.  Maven must have GWT dependency configured, or the compile will fail.  Note that so far, Maven does not compile GWT into javascript.  So far, we are still depending on a separate GWT compile.
    
        <dependency>
            <groupid>com.google.gwt</groupid>
            <artifactid>gwt-servlet</dependency>/artifactid>
            <version>2.4.0</version>
            <scope>compile</scope>
        </dependency>
        <dependency>
            <groupid>com.google.gwt</groupid>
            <artifactid>gwt-user</artifactid>
            <version>2.4.0</version>
            <scope>provided</scope>
        </dependency>        
 

Do another GWT compile and start-up the tomcat server.


Thursday, July 5, 2012

Web Project Setup and Introduction to TDD (Test Driven Development)

Using the Eclipse IDE, we will build a web application by assembling its parts.  Starting from the ground, and building-up, we will develop a web project "manually" and incorporate all the parts that a developer should include: Maven dependency management and JUnit testing.

Audience: Experienced developers who want a basic overview of configuring a web application without the use of Eclipse plugin wizards.

Using Eclipse Juno (4.2.0) with M2Eclipse Maven plugin.

Part 1. Create Java web project

Create a Java project. Call it "car"

Make the project a Maven project.  Right-click on the project and  select Maven -> Enable Dependency Management.  Select 'war' packaging and click 'Finish'.  This action will add a pom.xml file and setup directories for a web project.

Create folders src/main/java and src/test/java.  In the project properties-> Java Build Path, configure these folders to be source folders.

Create package com.car.domain and an empty Car class that we will use as a starting point later in this tutorial.

Create folder src/main/webapp/WEB-INF .  These will be the source folder for web content and configuration files.  Add a basic web.xml file that contains a welcome-file-list  element and error-page element.

Create a basic index.html file that says hello to the world. 

Perform a Maven clean install, and ensure a successful build.  Deployment output should have been created in the target exploded war folder..  In the next section we point tomcat to this exploded war folder.


Part 2. Configure Tomcat Server


During development we will need to start tomcat to see our web application in action.  Install EclipseTotale tomcat plugin http://www.eclipsetotale.com/tomcatPlugin.html.

Configure the  EclipseTotale plugin according to their instructions.  Test your ability to start/stop the server from the tomcat buttons added to the Eclipse toolbar.


Create a context xml file that points to the web app we're building.  I called this car.xml, and lives in the Tomcat config Catalina directory. For example,  C:\apache-tomcat-7.0.12\conf\Catalina\localhost\car.xml . For this app we have:
<?xml version="1.0" encoding="UTF-8"?>
<context docbase="C:\workspace\car\target\car-0.0.1-SNAPSHOT" path="car"></context>

Restart Tomcat and point your browser to http://localhost:8080/car . If your port is set to 8080, you should see your "hello world" index.html page.

Part 3. Add JUnit to the Project.

All development needs corresponding test development, which requires a good testing framework. We'll use JUnit.

Add JUnit to the pom.xml file.

<properties>
       <junit-version>4.8.1</junit-version>   
</properties>

<dependencies>
 <dependency>
   <groupId>junit>/groupId>
    <artifactId>junit</artifactId>
    <version>${junit-version}</version>
    <scope>test</scope>
   </dependency>
 </dependencies>

Part 4. A Brief Introduction to TDD (Test Driven Development)

TDD starts with a bite-sized user story:

"As a developer, I need the ability set color to a Car object"

What follows is a test that fails.  The failure can be caused by a compilation error (because there no code yet in the Car class), or some other run-time test failure.

In the src/test/java source folder, create a package that mirrors the package of the Car class.  Create class com.car.domain.CarTest.  Add a test method that tests setting color to Car.

So far we have:

package com.car.domain;

import org.junit.Assert;
import org.junit.Before;
import org.junit.Test;

public class CarTest {

    private Car car;
   
    @Before
    public void setup() {
        car = new Car();
    }
   
    @Test
    public void set_car_color_test() {
        car.setColor("blue");
        Assert.assertTrue(car.getColor() != null);
    }
   
}


This test will fail because no code exists yet.  Future TDD tests may fail for other run-time errors, but it's important the initial TDD tests fail.

Modify the Car class to set and get color:

package com.car.domain;

public class Car {

    private String color;

    public String getColor() {
        return color;
    }

    public void setColor(String color) {
        this.color = color;
    }   
}

The test now passes.  The test will show as passed in the Maven install output, or you can run the JUnit test in eclipse as shown in the screenshot below.